Katy is so happy. She has finished her first challenge based on Windows 10 IoT Core. The .NET world is so wonderful. You can create a library that is running on a Raspberry Pi, or your x64 desktop computer. No need to recompile, it just works. It was not an easy challenge to create, with many unexpected problems. But it is ready now. But... wait a minute. Oh no! What a mistake!
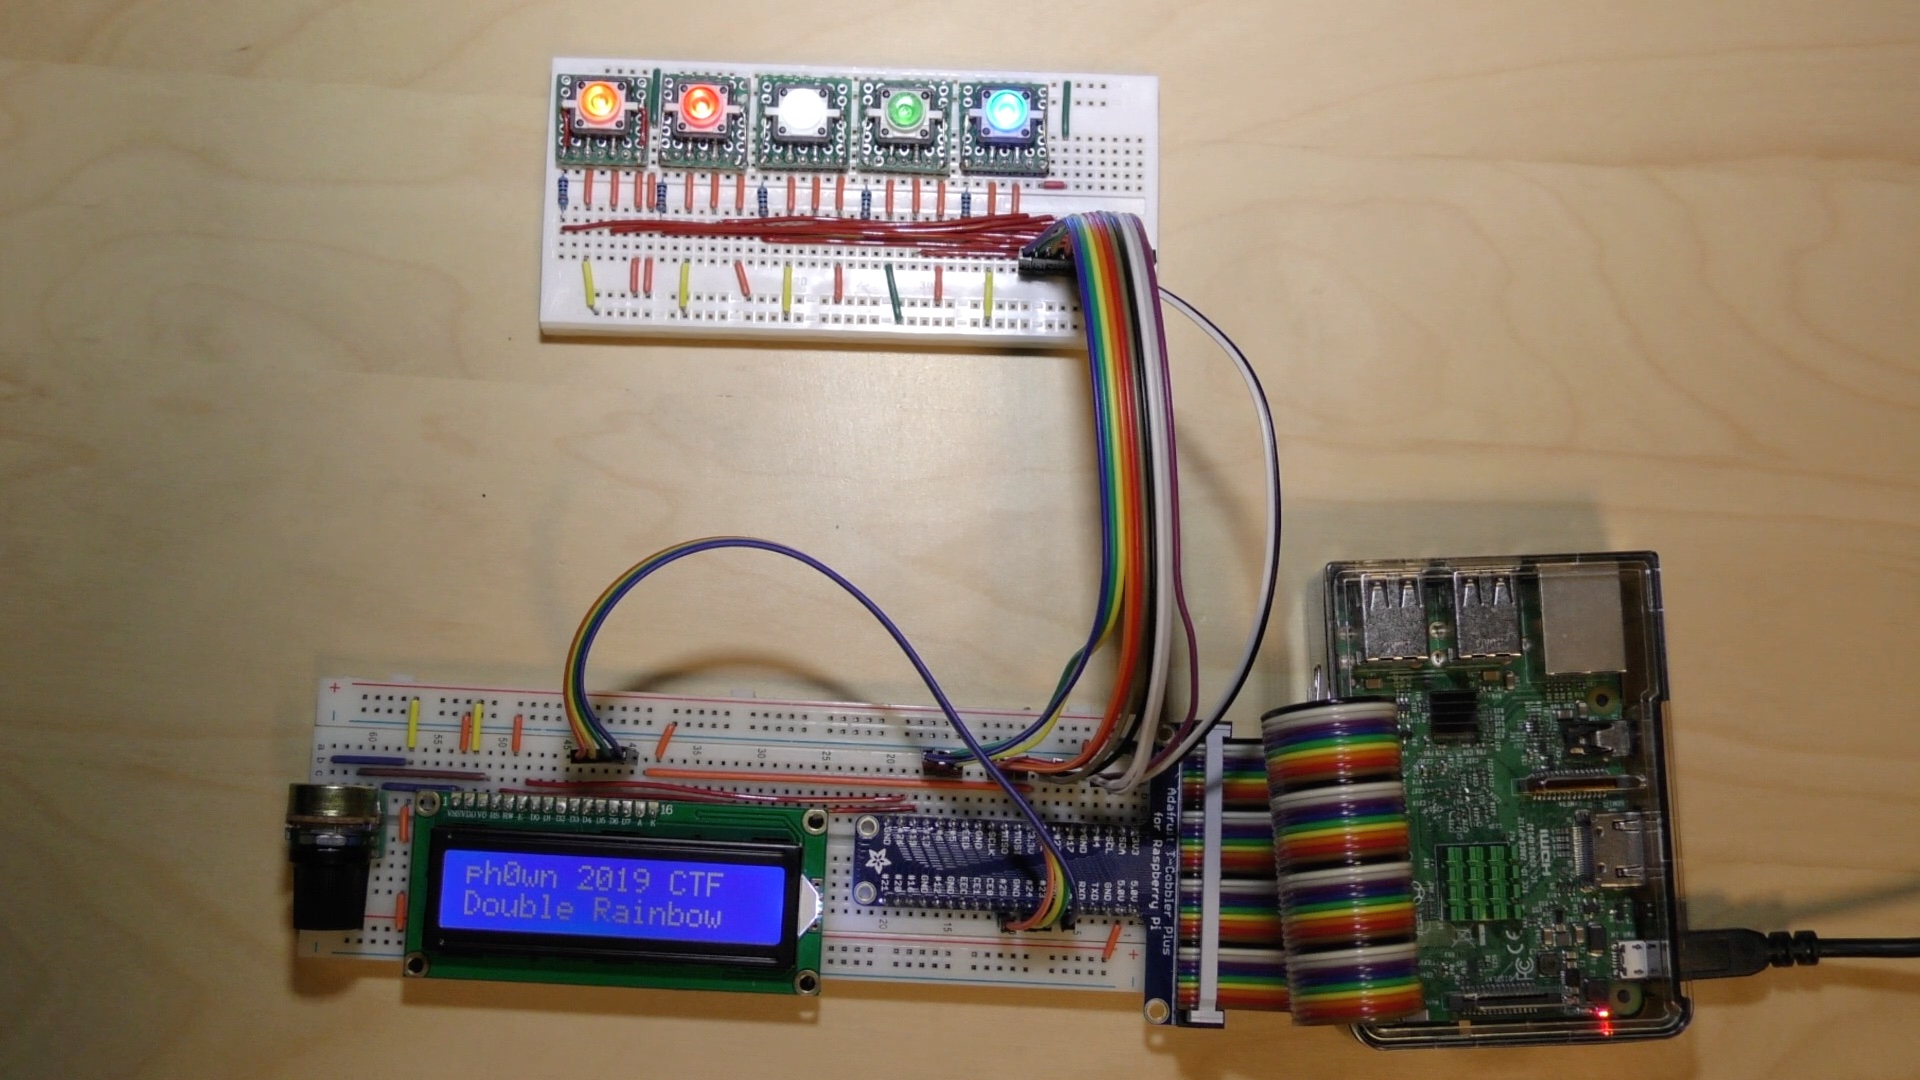
On the desk of the organizers, there is a Raspberry Pi 3B running Windows 10 IoT Core and a custom application, DoubleRainbow. The flag is given when you press the buttons in the right order. We provide on USB keys a disk image of the Data partition of the microSD card. There are also on the desk of the organizers. Find the code using this image and validate your finding on the actual hardware to get the flag.
Notes: The USB keys contains both Level 1 and Level 2. This challenge can be solved using any operating system, you do not need to have Windows.
Attachments: - A photo of the hardware - The schema of the hardware used by the challenge
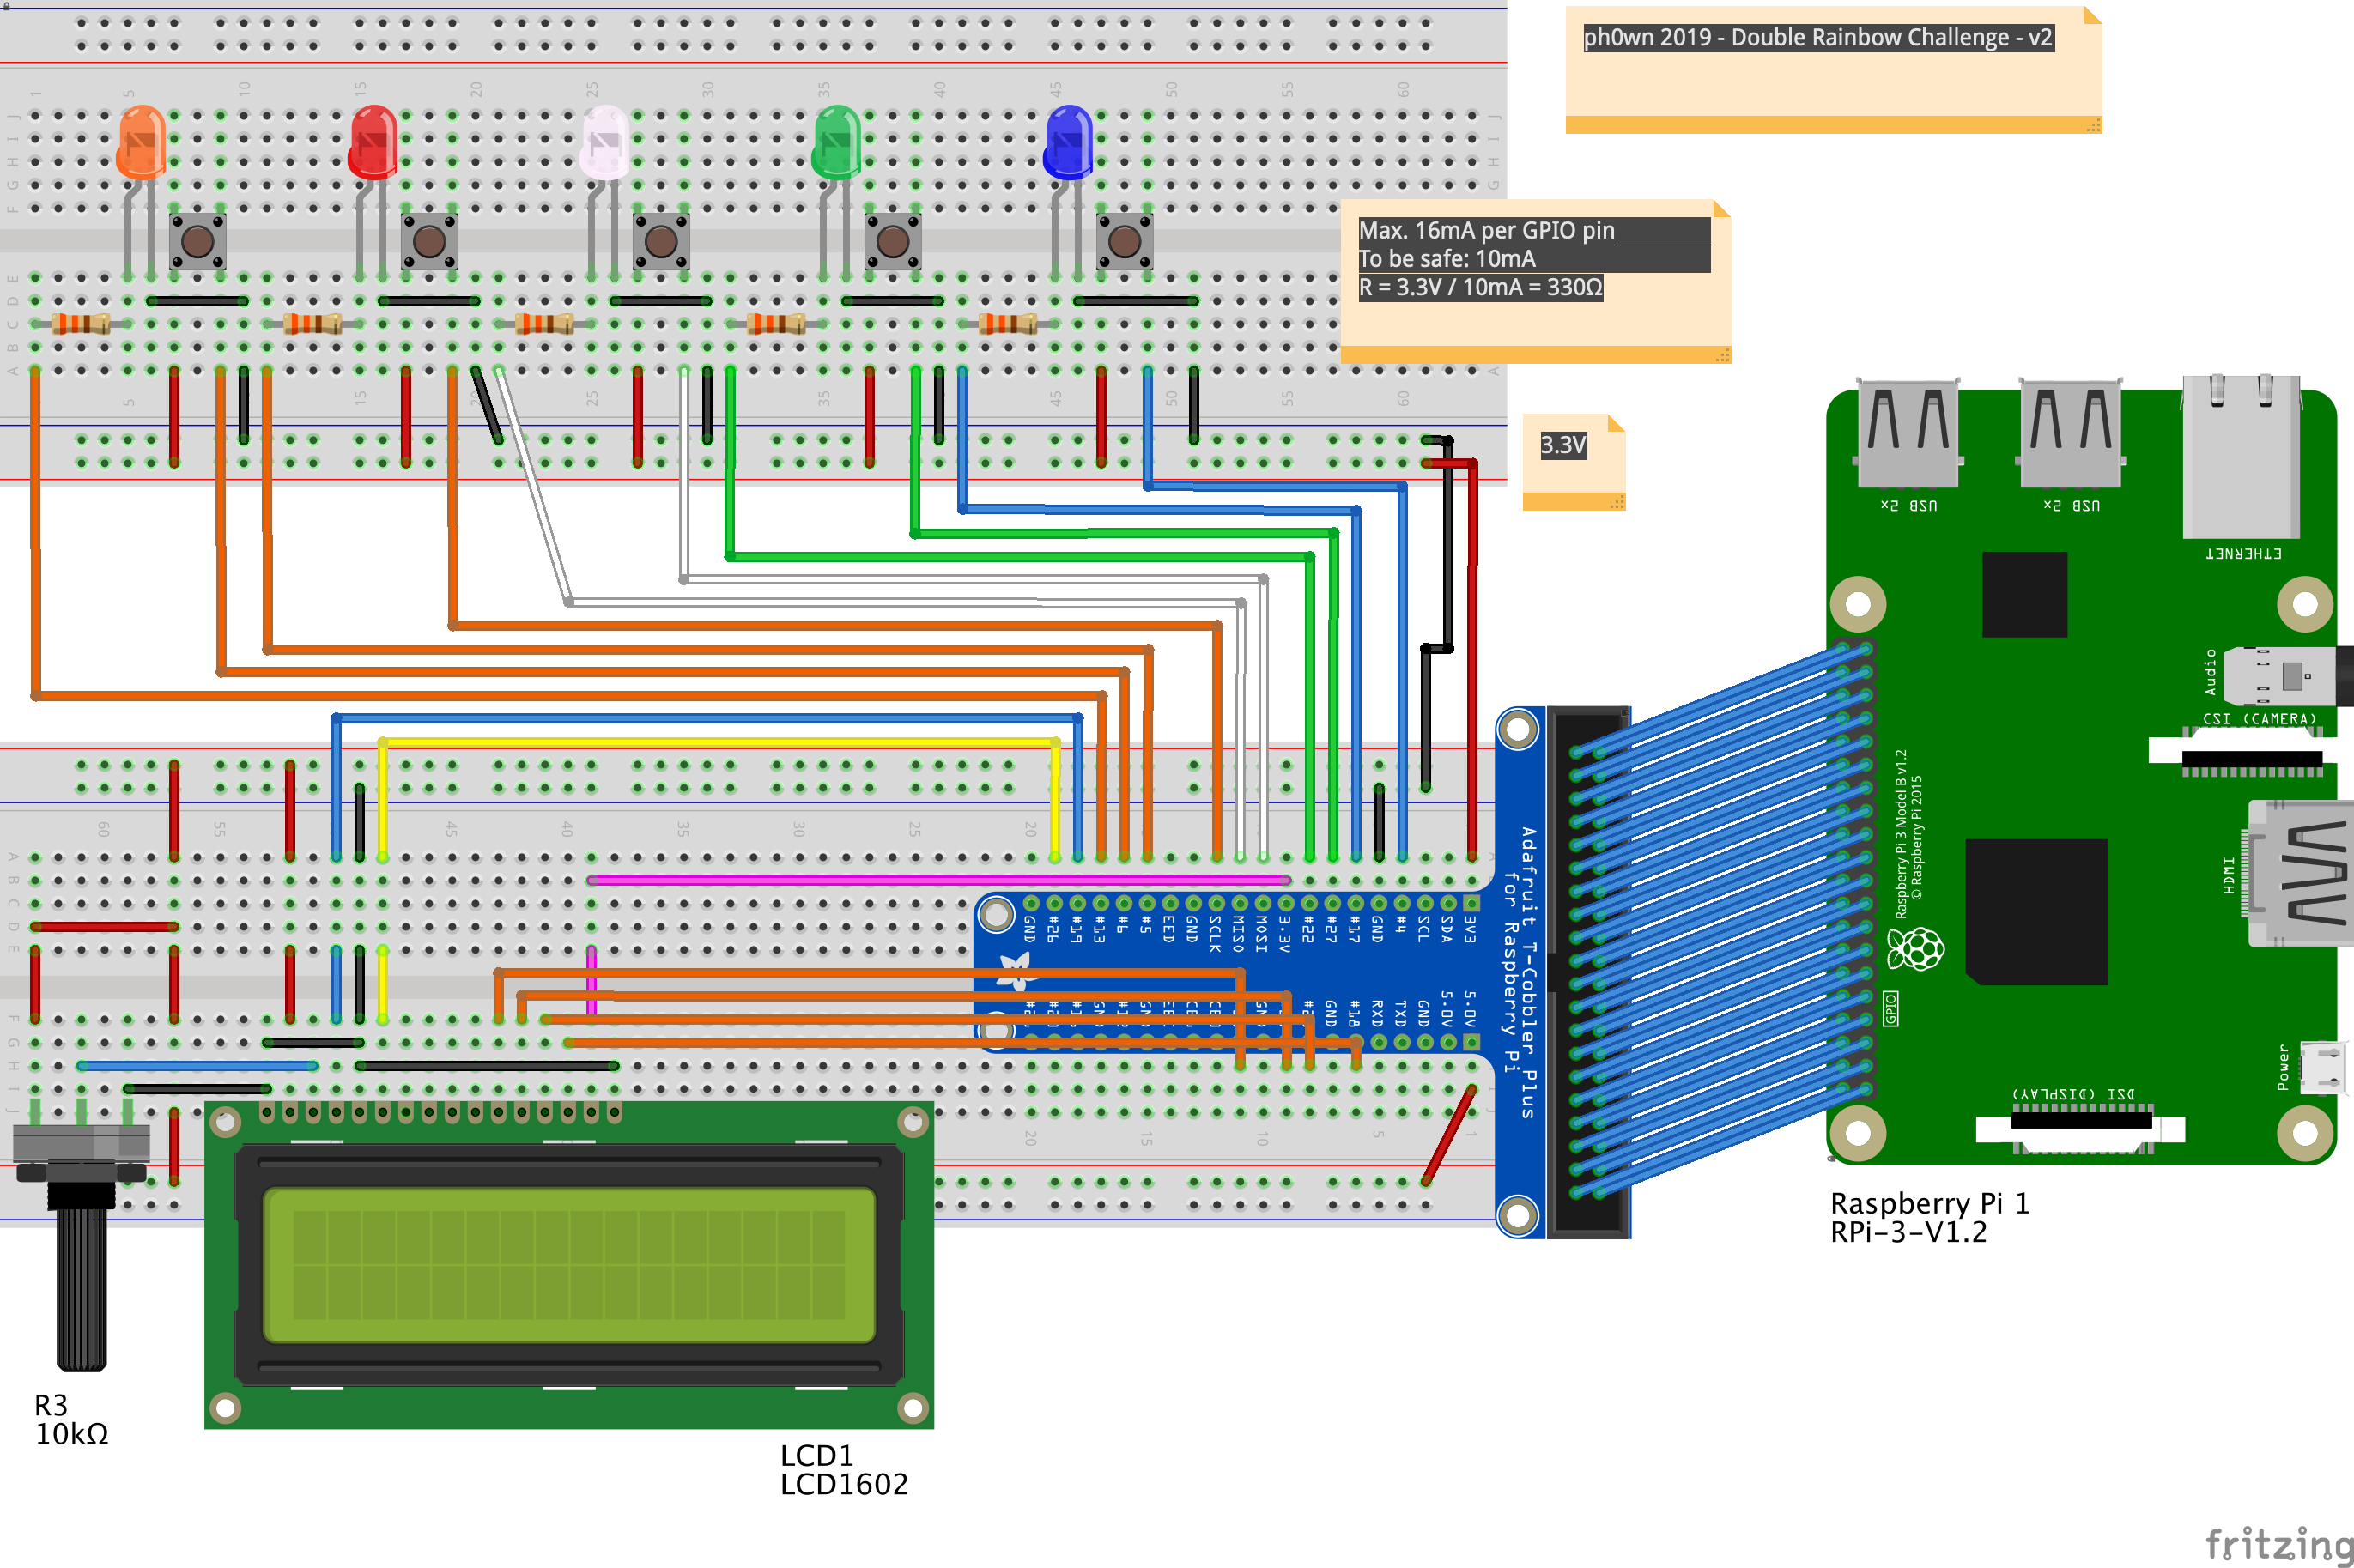
Note: The original schema had a mistake with the white LED.
This challenge can be solved with almost any operating system. The solution presented here uses a fresh and up to date installation of Kali Linux.
The image double-rainbow-level1.img.bz2 is compressed so the first thing to do is to decompress it:
bunzip2 double-rainbow-level1.img.bz2
We get a file double-rainbow-level1.img of 7.5 GiB.
The next thing to do is to identify the partitions int this disk image:
fdisk -l double-rainbow-level1.img
Disk double-rainbow-level1.img: 7.41 GiB, 7948206080 bytes, 15523840 sectors
Units: sectors of 1 * 512 = 512 bytes
Sector size (logical/physical): 512 bytes / 512 bytes
I/O size (minimum/optimal): 512 bytes / 512 bytes
Disklabel type: dos
Disk identifier: 0xae420040

Device                     Boot   Start      End  Sectors  Size Id Type
double-rainbow-level1.img1 *       4096   135167   131072   64M  c W95 FAT32 (LBA)
double-rainbow-level1.img2       147456  3074047  2926592  1.4G  7 HPFS/NTFS/exFAT
double-rainbow-level1.img3      3074048  3076095     2048    1M 70 DiskSecure Multi-Boot
double-rainbow-level1.img4      3076096 15523839 12447744    6G  5 Extended
double-rainbow-level1.img5      3080192 15523839 12443648    6G  7 HPFS/NTFS/exFAT
A description of partitions is available on Microsoft web site: IoT Device Layout
In our case, we have:
| Device | Size | Content |
|---|---|---|
| img1 | 64 MiB | EFIESP |
| img2 | 1.4 GiB | MainOS |
| img3 | 1 MiB | CrashDump |
| img4 | 6 GiB | Extended Volumes |
| img5 | 6 GiB | Data |
Custom applications are in the Data partition. In order to mount it we type:
mkdir /mnt/data
mount -t ntfs -o loop,ro,offset=$((3080192*512)) double-rainbow-level1.img /mnt/data
Note: 3080192 is given by fdisk (Start column). 512 is the number of bytes per allocation unit.
/mnt/data/ now contains the Data partition:
ls -la
total 307252
drwxrwxrwx 1 root root      4096 Sep 22 22:13  .
drwxr-xr-x 3 root root      4096 Sep 24 19:45  ..
-rwxrwxrwx 1 root root     35296 Sep 22 20:07 '$UGM'
drwxrwxrwx 1 root root         0 Oct 27  2018  CrashDump
-rwxrwxrwx 1 root root 314572800 Sep 22 19:58  DedicatedDumpFile.sys
-rwxrwxrwx 1 root root         0 Oct 27  2018  FirstBoot.Complete
drwxrwxrwx 1 root root         0 Sep 22 22:13  .fseventsd
drwxrwxrwx 1 root root         0 Oct 27  2018  Logfiles
drwxrwxrwx 1 root root         0 Oct 27  2018  ProgramData
drwxrwxrwx 1 root root         0 Oct 27  2018  Programs
drwxrwxrwx 1 root root         0 Oct 27  2018  SharedData
drwxrwxrwx 1 root root         0 Oct 27  2018  SystemData
drwxrwxrwx 1 root root         0 Sep 22 18:12 'System Volume Information'
drwxrwxrwx 1 root root         0 Oct 27  2018  test
drwxrwxrwx 1 root root         0 Oct 27  2018  Users
drwxrwxrwx 1 root root         0 Oct 27  2018  Windows
We can study Microsoft's documentation in order to determine were the application is located. But we can also simply use find to get an idea:
find . -iname "double*"
./ProgramData/Microsoft/Windows/AppRepository/DoubleRainbow1-uwp_1.0.0.0_arm__r63asj4s1fa58.xml
./ProgramData/Microsoft/Windows/AppRepository/Packages/DoubleRainbow1-uwp_1.0.0.0_arm__r63asj4s1fa58
./Users/DefaultAccount/AppData/Local/DevelopmentFiles/DoubleRainbow1-uwpVS.Debug_ARM.sebas
./Users/DefaultAccount/AppData/Local/DevelopmentFiles/DoubleRainbow1-uwpVS.Debug_ARM.sebas/DoubleRainbow1.winmd
./Users/DefaultAccount/AppData/Local/DevelopmentFiles/DoubleRainbow1-uwpVS.Debug_ARM.sebas/DoubleRainbow1Lib.dll
./Users/DefaultAccount/AppData/Local/Packages/DoubleRainbow1-uwp_r63asj4s1fa58
The application is located in the folder ./Users/DefaultAccount/AppData/Local/DevelopmentFiles/DoubleRainbow1-uwpVS.Debug_ARM.sebas/
ls -la ./Users/DefaultAccount/AppData/Local/DevelopmentFiles/DoubleRainbow1-uwpVS.Debug_ARM.sebas/
total 384
drwxrwxrwx 1 root root 16384 Sep 22 19:55 .
drwxrwxrwx 1 root root 16384 Sep 22 19:55 ..
-rwxrwxrwx 1 root root  4053 Sep 22 19:56 AppxManifest.xml
drwxrwxrwx 1 root root 16384 Sep 22 19:53 Assets
-rwxrwxrwx 1 root root 16896 Sep 22 19:54 DoubleRainbow1Lib.dll
-rwxrwxrwx 1 root root  4608 Sep 22 19:56 DoubleRainbow1.winmd
drwxrwxrwx 1 root root     0 Sep 22 19:55 microsoft.system.package.metadata
-rwxrwxrwx 1 root root 24576 Oct 23  2018 Microsoft.UI.Xaml.Markup.winmd
-rwxrwxrwx 1 root root 57488 May 15  2018 Microsoft.Win32.Registry.dll
drwxrwxrwx 1 root root     0 Sep 22 19:53 Properties
-rwxrwxrwx 1 root root  5096 Sep 22 19:56 resources.pri
-rwxrwxrwx 1 root root 48712 Aug 13 16:09 System.Device.Gpio.dll
-rwxrwxrwx 1 root root 50736 Mar 12  2019 System.Runtime.dll
-rwxrwxrwx 1 root root 16456 Mar 12  2019 UWPShim.exe
-rwxrwxrwx 1 root root 14669 Sep 22 19:57 vs.appxrecipe
drwxrwxrwx 1 root root     0 Sep 22 19:53 WinMetadata
If you know a little .NET development, this should looks familiar.
What we can try to do is to decompile the .NET application. There are several decompilers available for Linux, macOS and Windows. A solution that works for these 3 operating system is to use Microsoft Visual Studio Code and the ILSpy .NET Decompiler plugin.
.debsudo dpkg -i code_1.38.1-1568209190_amd64.debILSpy and select ILSpy .NET Decompiler
sudo apt install apt-transport-https dirmngr gnupg ca-certificates
sudo apt-key adv --keyserver hkp://keyserver.ubuntu.com:80 --recv-keys 3FA7E0328081BFF6A14DA29AA6A19B38D3D831EF
echo "deb https://download.mono-project.com/repo/debian stable-buster main" | sudo tee /etc/apt/sources.list.d/mono-official-stable.list
sudo apt update
sudo apt install mono-devel
The installation takes some time.
We can now decompile .NET code:
ILSpy.ILSpy: Decompile IL Assembly (pick file)DoubleRainbow1Lib.dll in /mnt/Data/Users/DefaultAccount/AppData/Local/DevelopmentFiles/DoubleRainbow1-uwpVS.Debug_ARM.sebas/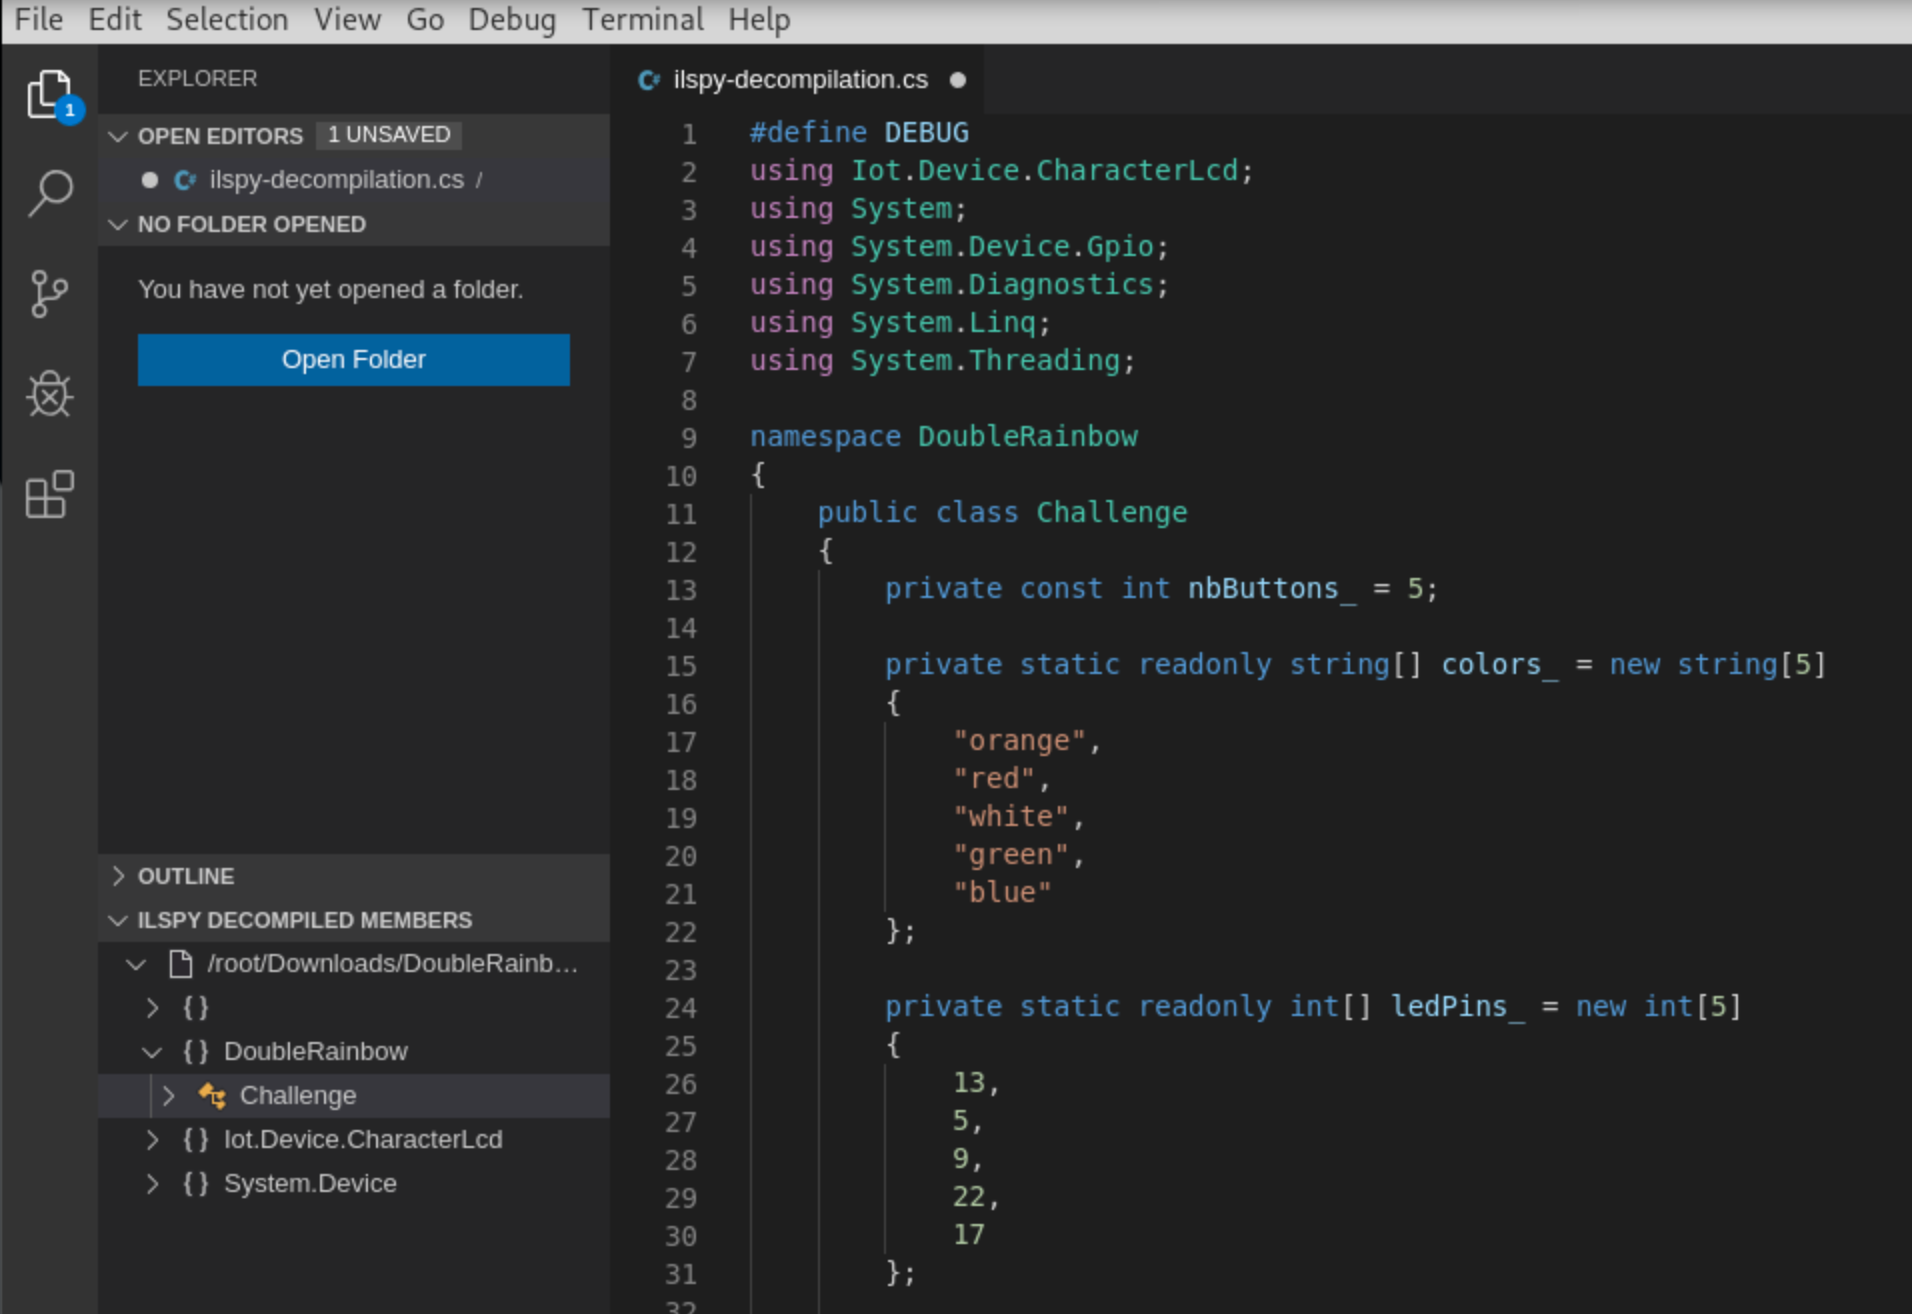
private string[] level1Flag = new string[2]
{
    "ph0wn{our-hearts",
    "-in-vain}"
};

private string[] level2Flag = new string[2]
{
    "ph0wn{fell-under",
    "-your-spell}"
};
But these codes are hoaxes (they are taken from a song of Britney Spears, not Katy Perry - Yes "Double Rainbow" is a song of Katy Perry). Finding the codes with just strings would be too easy.
ButtonCallback is called:private void ButtonCallback(object sender, PinValueChangedEventArgs pinValueChangedEventArgs)
{
int num = pin2index_[pinValueChangedEventArgs.get_PinNumber()];
Debug.Assert(num >= 0);
lock (codeLock_)
{
if (codeIndex_ > 0)
{
LightLED(code_[codeIndex_ - 1], on: false);
}
code_[codeIndex_++] = num;
LightLED(num);
WriteLines($"Color #{codeIndex_} pressed", colors_[num]);
if (codeIndex_ >= code_.Length)
{
VerifyCode();
}
}
}
lock since the code is asynchronous and to avoid the case when a button is pressed when another one is currently processed. LightLED is used to switch the previous button off. code_ and code_Index_ is incremented. So the sequence of buttons we press is recorded into code_.LightLED)Color #x pressed)codeIndex_ is greater than code_.Length, VerifyCode is called. So the code is verified when the code_ buffer is full (5 colors).So let's look at VerifyCode:
private void VerifyCode()
{
    LightLED(code_[codeIndex_ - 1], on: false);
    Wait(1.0);
    if (code1_.SequenceEqual(code_))
    {
        WriteFlag("Congrats", "Go to Desk");
    }
    else
    {
        WriteLines("Wrong Code", "Try again", 2);
    }
    codeIndex_ = 0;
    Welcome();
}
It simply compares code_ with code1_ and code1_ is:
private readonly int[] code1_ = new int[5]
{
    0,
    1,
    0,
    4,
    3
};
The colors are given by:
private static readonly string[] colors_ = new string[5]
{
    "orange",
    "red",
    "white",
    "green",
    "blue"
};
And it gives:
| code_1 | colors_ |
|---|---|
| 0 | orange |
| 1 | red |
| 0 | orange |
| 4 | blue |
| 3 | green |
orange, red, orange, blue, green
ph0wn{a-one-of-a-kind}