For various reasons (like having an autonomous, network-enabled 3D printer), I like to run OctoPrint on a Raspberry Pi device.
Raspberry Pi-s are powerful computers based on Broadcom chips. They contain a quad-core ARM Cortex A72 (ARMv8) cluster running at 1.5 GHz (Raspberry Pi 4) or ARM Cortex A53 cluster running at 1.4 GHz (Raspberry Pi 3B+).
OctoPrint is created and maintained by Gina Häußge "Foosel". It is written in Python, open-source and published on GitHub, extendable with plugins, and it is compatible with software such as Ultimaker Cura.
This document describes in details the way I like to install and configure a Raspberry Pi (4 or earlier) running Raspbian and OctoPrint (in fact, more than one instance of OctoPrint), with Supervisor and Nginx. As often, there is more than one way to do things, and this is just one way.
Updated for OctoPrint 1.8. Remove Python 2.7 instructions. Add Raspberry Pi Trading MAC addresses.
Updated for OctoPrint 1.4.0 and Python 3. If you are interested only by the Python 3 part, go directly to the "Setup OctoPrint under Python 3" paragraph.
Updated for the Raspberry Pi 4 and Raspbian Buster.
Notes:: Even if the Raspberry Pi 4 is a able to run OctoPrint without any problem, it is a little overkill and today the best option is to use a Raspberry 3B+.
This is the second iteration of this document. In the previous one, due to a bug, I have to rely on different host names for each instance of OctoPrint. As this bug is now fixed, it is no more necessary.
In this version:
raspi-config options are set on the command line (without raspi-config interface)I have the following objectives with this installation:
Important: This guide can be used to control multiple printers, but this is not a recommended configuration. The intent of this guide is to have multiple instances of OctoPrint for the same printer.
As explained in the Objectives, I want to run more than one instance of OctoPrint on the same Raspberry Pi device. Here is the list of OctoPrint instances, with their associated branch, python virtual environments, internal ports and description. The table includes also the webcam streamer.
| Name | Branch | Virtual Env | Internal Port | Description |
|---|---|---|---|---|
| webcam | n/a | n/a | 6000 | WebCam |
| stable | master | stable | 6001 | Current stable release, Python 3.10.7 |
| testing | rc/maintenance | testing | 6002 | Maintenance release candidates (next stable) |
| unstable | devel | unstable | 6003 | Current Foosel development version |
| dev | - | dev | 6099 | My current development version |
This is a non-official guide. There is an official one from Gina with different choices.
ssh file into the root of the boot partition.IMPORTANT: It is important to place a ssh file into the boot of the microSD. It will instruct the operating system to start a SSH daemon. The content of this file is not important (it can be empty). To add this file, mount the microSD card in your operating system and create the ssh file in the boot partition (not the rootfs one). Note that this step will only work if your network is able to distribute IP addresses (i.e. has a DHCP server). Under macOS, the ssh file can be created with the following command:
touch /Volumes/boot/ssh
diskutil eject /Volumes/boot
There are several ways to get the IP address:
nmap to scan the network and find the device To use nmap, you have to install it. Under macOS (with homebrew):
brew install nmap
Under Debian/Ubuntu:
sudo apt install nmap
Under CentOS:
sudo yum install nmap
Under Windows, you can download nmap installer from the official web site.
If your network is 192.168.1.0, enter the following command (if you do not know your network, use ifconfig / ipconfig):
$ sudo nmap -sP 192.168.1.0/24 | awk '/^Nmap/{ip=$NF}/B8:27:EB|28:CD:C1|DC:A6:32|E4:5F:01/{print ip}'
It will output line(s) such as:
(192.168.1.20)
This command relies on the fact that the MAC addresses of Raspberry Pi devices start with B8:27:EB (the OUI assigned to the Raspberry Foundation: http://standards-oui.ieee.org/oui.txt), 28:CD:C1, DC:A6:32 or E4:5F:01 (the OUIs assigned to the Raspberry Pi Trading Ltd).
Check that the port 22 (ssh) is indeed open with the command:
nmap -p 22 192.168.1.20
It replies with something similar to this:
nmap -p 22 192.168.1.20
Starting Nmap 7.80 ( https://nmap.org ) at 2019-08-15 22:49 CEST
Nmap scan report for octoprint2.home (192.168.1.20)
Host is up (0.0041s latency).

PORT   STATE SERVICE
22/tcp open  ssh

Nmap done: 1 IP address (1 host up) scanned in 0.06 seconds
If it is not the case (for example: 22/tcp closed ssh), it is probably because you forget to put a ssh file in the root file system.
In the remaining of this document, we will assume that the IP address of the Raspberry Pi device is 192.168.1.20.
Once the device has booted, login. The default credentials are pi / raspberry.
ssh pi@192.168.1.20
The first step is to change the pi password. Choose your own:
passwd
Then update the packages to the latest version:
sudo apt update
sudo apt full-upgrade
Then we will use the raspi-config tool in command-line mode to:
en_US.UTF8)Europe/Zurich)octoprint)0 means enable)sudo raspi-config nonint do_change_locale en_US.UTF-8 sudo raspi-config nonint do_change_timezone Europe/Zurich sudo raspi-config nonint do_hostname octoprint1 sudo raspi-config nonint do_ssh 0 sudo raspi-config nonint do_memory_split 16 sudo raspi-config nonint do_expand_rootfs
Then reboot:
sudo reboot
After a while, connect again by SSH (with the password you set previously).
Update the system:
sudo apt update
sudo apt -y upgrade
sudo reboot
sudo apt install -y curl aria2 git micro
Notes:
In the current version of Raspberry Pi OS, curl is already installed but it may change in the future so I still include them here.
aria2 is a download utility. When it is installed, it is used by pyenv install (instead of curl or wget) and shows a download progress indicator.
I prefer to use micro (https://micro-editor.github.io) as editor.
The NTP client is not enabled by default. To enable it, edit (with sudo nano) /etc/systemd/timesyncd.conf and add the line:
[Time]
Servers=0.debian.pool.ntp.org 1.debian.pool.ntp.org 2.debian.pool.ntp.org 3.debian.pool.ntp.org
Enable and start the service:
sudo systemctl daemon-reload
sudo systemctl start systemd-timesyncd
sudo systemctl enable systemd-timesyncd
Eternal Terminal (ET) is a remote shell that automatically reconnects without interrupting the session.
echo "deb https://mistertea.github.io/debian-et/debian-source/ bullseye main" | sudo tee /etc/apt/sources.list.d/et.list
curl -sS https://mistertea.github.io/debian-et/et.gpg | sudo apt-key add -
sudo apt update
sudo apt install et
Note: you also have to install the et client on your computer.
![]()
I am using ssh with iTerm2 (under macOS) in order to connect to remote servers. I create a profile with these parameters:
ssh -t pi@192.168.1.20 "tmux attach || tmux new"I never use su. One difference between sudo and su is that with sudo, you provide your current password. With su, you have to provide the password of the new login.
To switch to root:
sudo -i
To switch to another user (for example octoprint):
sudo -iu octoprint
Prepare colors for bash ls:
sudo bash -c 'dircolors -p > /etc/dircolors'
Edit ~/.bashrc:
...
force_color_prompt=yes
...
PS1='${debian_chroot:+($debian_chroot)}\[\033[36m\]\u\[\033[m\]@\[\033[32m\]\h:\[\033[33;1m\]\W\[\033[m\]\$ '
...
alias ll='ls -l'
...
To make the changes active:
. ~/.bashrc
I like to use lnav to read and display the logs in real time:
sudo apt install -y lnav
Then, to display logs (as an example):
sudo lnav /var/log/nginx/* /var/log/supervisor/*
We use one dedicated user octoprint for all OctoPrint instances, one dedicated user webcam for the webcam:
sudo useradd --groups dialout,tty --create-home --system --shell /bin/bash octoprint
sudo useradd --groups video --create-home --system --shell /bin/bash webcam
Note: Accounts octoprint and webcam have no password so you cannot directly login with those accounts and this is what we want here. To login, we use sudo -iu.
We give octoprint the right to execute command to restart OctoPrint and the system. Create the file /etc/sudoers.d/020_octoprint with the command:
sudo visudo -f /etc/sudoers.d/020_octoprint
Enter the following:
Cmnd_Alias SHUTDOWN_CMDS = /sbin/poweroff, /sbin/reboot
Cmnd_Alias SUPERVISOR_COMMANDS = /usr/bin/supervisorctl

octoprint ALL=(ALL) NOPASSWD: SHUTDOWN_CMDS, SUPERVISOR_COMMANDS
Check that everything is OK:
sudo visudo -c

I am using a Logitech C270 HD. Even if it is cheap, it supports a resolution of 720p (16:9) and MJPG.
Install requirements:
sudo apt -y install libjpeg62-turbo-dev imagemagick ffmpeg libv4l-dev cmake
It takes several minutes.
Note: There are other requirements, but they are already installed at this stage.
Connect with webcam identity:
sudo -iu webcam
Download and compile the MJPG Streamer:
git clone https://github.com/jacksonliam/mjpg-streamer.git
cd mjpg-streamer/mjpg-streamer-experimental
export LD_LIBRARY_PATH=.
make
To start capturing video:
cd ~/mjpg-streamer/mjpg-streamer-experimental
./mjpg_streamer -i "./input_uvc.so" -o "./output_http.so"
If everything is OK, it displays something like:
 i: Using V4L2 device.: /dev/video0
 i: Desired Resolution: 640 x 480
 i: Frames Per Second.: -1
 i: Format............: JPEG
 i: TV-Norm...........: DEFAULT
UVCIOC_CTRL_ADD - Error at Pan (relative): Inappropriate ioctl for device (25)
UVCIOC_CTRL_ADD - Error at Tilt (relative): Inappropriate ioctl for device (25)
UVCIOC_CTRL_ADD - Error at Pan Reset: Inappropriate ioctl for device (25)
UVCIOC_CTRL_ADD - Error at Tilt Reset: Inappropriate ioctl for device (25)
UVCIOC_CTRL_ADD - Error at Pan/tilt Reset: Inappropriate ioctl for device (25)
UVCIOC_CTRL_ADD - Error at Focus (absolute): Inappropriate ioctl for device (25)
UVCIOC_CTRL_MAP - Error at Pan (relative): Inappropriate ioctl for device (25)
UVCIOC_CTRL_MAP - Error at Tilt (relative): Inappropriate ioctl for device (25)
UVCIOC_CTRL_MAP - Error at Pan Reset: Inappropriate ioctl for device (25)
UVCIOC_CTRL_MAP - Error at Tilt Reset: Inappropriate ioctl for device (25)
UVCIOC_CTRL_MAP - Error at Pan/tilt Reset: Inappropriate ioctl for device (25)
UVCIOC_CTRL_MAP - Error at Focus (absolute): Inappropriate ioctl for device (25)
UVCIOC_CTRL_MAP - Error at LED1 Mode: Inappropriate ioctl for device (25)
UVCIOC_CTRL_MAP - Error at LED1 Frequency: Inappropriate ioctl for device (25)
UVCIOC_CTRL_MAP - Error at Disable video processing: Inappropriate ioctl for device (25)
UVCIOC_CTRL_MAP - Error at Raw bits per pixel: Inappropriate ioctl for device (25)
 o: www-folder-path......: disabled
 o: HTTP TCP port........: 8080
 o: HTTP Listen Address..: (null)
 o: username:password....: disabled
 o: commands.............: enabled
The errors are expected and depend of the features of your camera.
Open a navigator and enter the URL: http://192.168.1.20:8080/?action=stream. It displays the video captured by the webcam.
There are plenty of options available. For example to record images in 720p, at the frequency of 25 images per seconds and restrict the binding address to localhost (instead of 0.0.0.0), type:
./mjpg_streamer -o "output_http.so -w ./www -l 127.0.0.1" -i "input_uvc.so -r 1280x720 -f 25"
Note: If you kill mjpg_streamer and start it again immediately, it may fail with errors such as Device or resource busy, Access denied, etc. Sometimes, you have to wait some minutes before restarting mjpg_streamer.
At this stage, you can leave the webcam identity (and go back to pi one):
exit
![]()
sudo apt-get install -y git make build-essential zlib1g-dev libncurses5-dev libgdbm-dev libnss3-dev libssl-dev libreadline-dev libffi-dev libsqlite3-dev wget libbz2-dev
I like to use pyenv because thank to it, I can precisely manage which version(s) of Python is installed. And thanks to pyenv-virtualenv, a pyenv plugin, I can manage virtual environments.
Download and execute pyenv installer:
sudo -iu octoprint
curl -L https://raw.githubusercontent.com/yyuu/pyenv-installer/master/bin/pyenv-installer | bash
Add the following to the end of ~/.bashrc:
# pyenv
export PATH="~/.pyenv/bin:$PATH"
eval "$(pyenv init -)"
eval "$(pyenv virtualenv-init -)"
Refresh the environment:
. ~/.bashrc

To get the list of installable Python 3.10 versions, type:
pyenv install --list | grep '^ *3\.10'
If available, you may want to install a more recent version.
pyenv install -v 3.10.7
It takes several minutes.
mkdir ~/stable
cd ~/stable
pyenv virtualenv 3.10.7 stable
pyenv local stable
pip install --upgrade pip wheel
pip install OctoPrint
It takes several minutes.
mkdir -p ~/.octoprint/stable
Since we will have more than one OctoPrint instance, it is important to specify explicitly the base directory. Start OctoPrint with:
cd ~/stable
octoprint serve --basedir ~/.octoprint/stable
If you get the error octoprint: command not found, refresh your environment with:
. ~/.bashrc
After a few seconds, open in a navigator the URL http://192.168.1.20:5000/. The OctoPrint Setup Wizard appears:
Access Control is now mandatory. Create a user such as admin with a strong password.
Connectivity Check. I use default settings except for the Host IP where I use 1.1.1.1 instead (see 1.1.1.1 on Wikipedia). Click on Test host & port, Test name resolution, Enable Connectivity Check.
Enable Anonymous Usage Tracking as it provides valuable information to Gina and her Privacy Policy and Anonymous Usage Tracking article are pretty clear about the kind of information collected.
Enable Plugin Blacklist Processing.
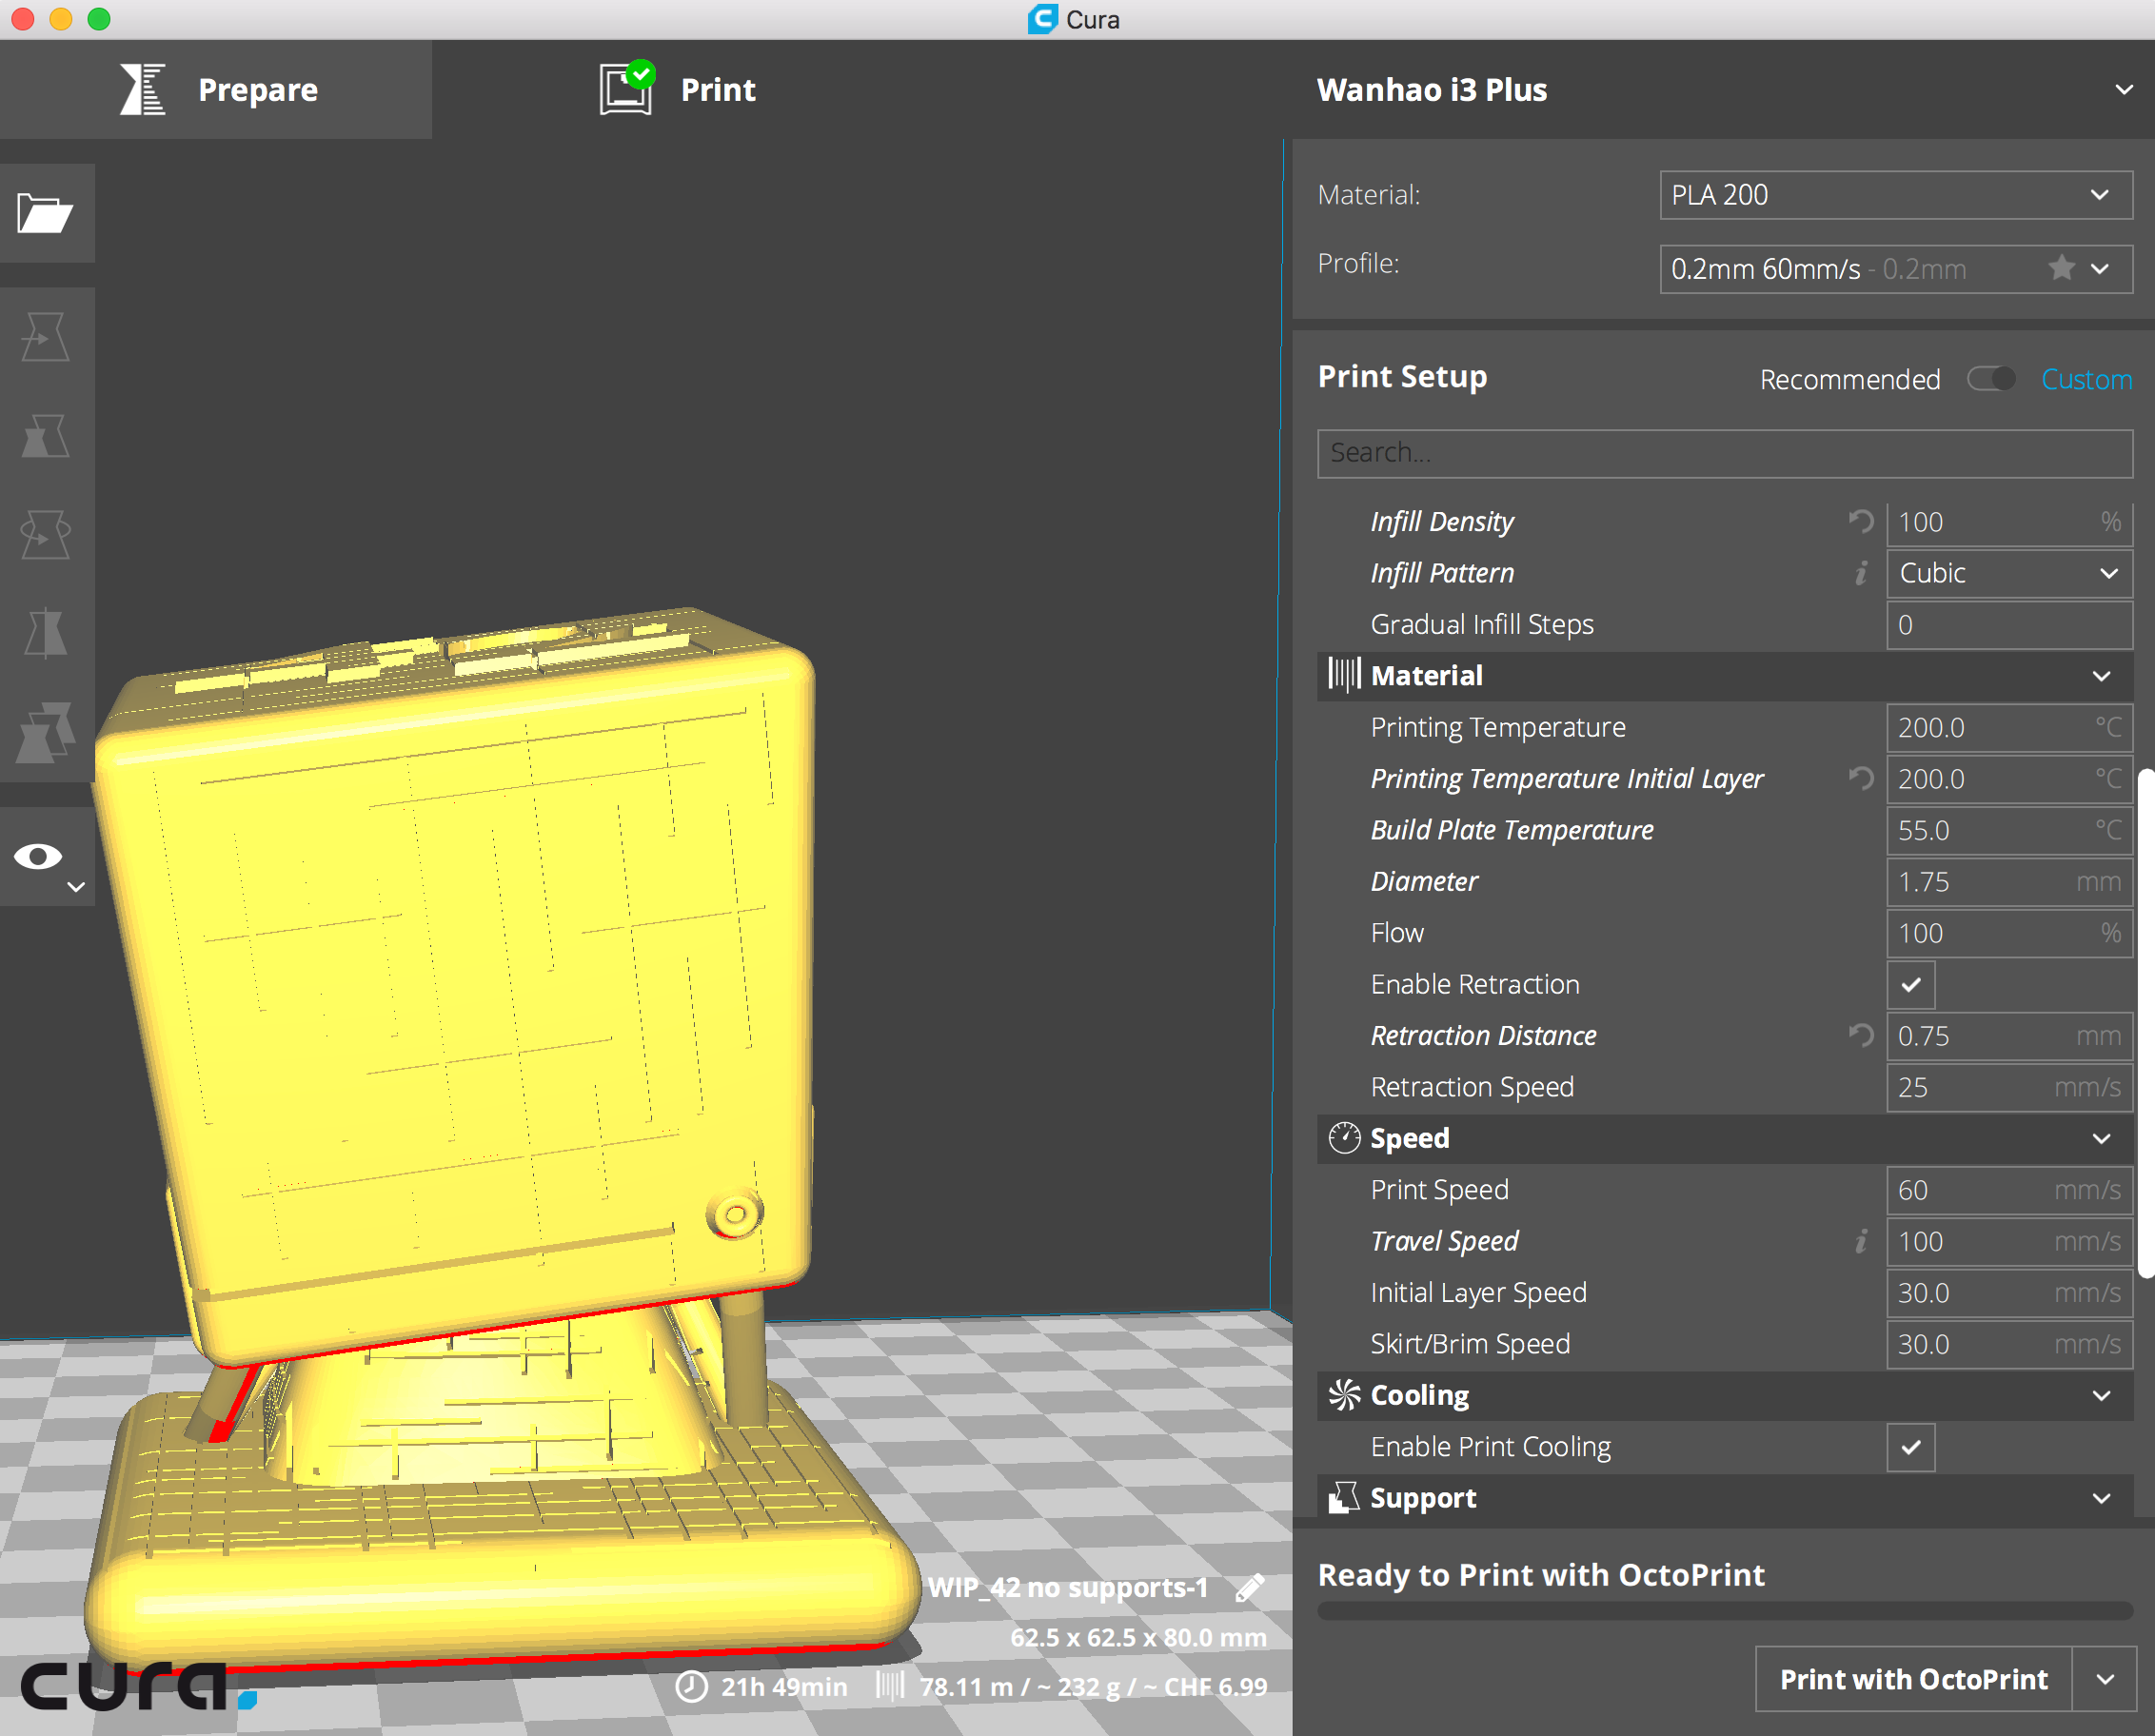
Fill in Printer Profile. Do not forget Print bed & build volume, Axes, Hotend & extruder. For my printer (Wanhao i3 Plus), I have to invert the Y axis.
Commands:
sudo /usr/bin/supervisorctl restart octoprint:stablesudo /sbin/rebootsudo /sbin/poweroffWebcam & Timelapse Recordings (do not test these settings as Nginx is not yet installed to serve those URLs):
http://192.168.1.20/webcam/?action=streamhttp://192.168.1.20/webcam/?action=snapshot/usr/bin/ffmpegWhen everything is set the way you like, press Ctrl-C to quit OctoPrint process. You can leave the octoprint identity:
exit

![]()
We need a way to start OctoPrint processes with the right user (octoprint) and python virtual environment (such as stable) and to forward incoming HTTP requests to the right instance. There are several ways to do that. In such situations, I like to use Supervisor to manage processes, Gunicorn as application server and Nginx as reverse proxy server. By coincidence, the logo of Supervisor is also an octopus.
In the particular case of OctoPrint, and if I understand correctly (but I am not 100% sure) how it works, HTTP requests are handled by Tornado. So there is no need for Gunicorn and we simply connect the reverse proxy to OctoPrint instances.
I prefer to use Nginx instead of HAProxy because HAProxy is perfect for load balancing but this is not what we need here.
sudo apt -y install supervisor
Edit (sudo nano) /etc/supervisor/supervisord.conf. Replace the content with:
[unix_http_server]
file=/var/run/supervisor.sock
chmod=0700
username = supervisor
password = <set your own strong password>

[supervisord]
user = root
logfile=/var/log/supervisor/supervisord.log
pidfile=/var/run/supervisord.pid
childlogdir=/var/log/supervisor

[rpcinterface:supervisor]
supervisor.rpcinterface_factory = supervisor.rpcinterface:make_main_rpcinterface

[supervisorctl]
serverurl=unix:///var/run/supervisor.sock ; use a unix:// URL  for a unix socket
username = supervisor
password = <set your own strong password>

[include]
files = /etc/supervisor/conf.d/*.conf
Note: Of course, use your own (randomly generated) strong password.
Create (sudo nano) /etc/supervisor/conf.d/webcam.conf:
[program:webcam]
directory = /home/webcam/mjpg-streamer/mjpg-streamer-experimental
command = /home/webcam/mjpg-streamer/mjpg-streamer-experimental/mjpg_streamer -o "output_http.so -w ./www -l 127.0.0.1 -p 6000" -i "input_uvc.so -r 1280x720 -f 25"
user = webcam
group = webcam
redirect_stderr = true
stdout_logfile = /var/log/supervisor/webcam.log
Create (sudo nano) /etc/supervisor/conf.d/stable.conf:
[program:stable]
directory = /home/octoprint/stable
command = /home/octoprint/.pyenv/versions/stable/bin/octoprint --basedir "/home/octoprint/.octoprint/stable" --host localhost --port 6001 serve
user = octoprint
group = octoprint
redirect_stderr = true
stdout_logfile = /var/log/supervisor/stable.log
Create (sudo nano) /etc/supervisor/conf.d/octoprint.conf:
[group:octoprint]
programs=stable,webcam
sudo supervisorctl reread
sudo supervisorctl update
sudo supervisorctl status
You should see something like:
octoprint:stable                 RUNNING   pid 25437, uptime 0:00:05
webcam                           RUNNING   pid 25438, uptime 0:00:05
![]()
sudo apt install -y nginx-full
By default, only a few values are logged by Nginx. I prefer to have a little more information in a different order (date and time first). Create (sudo nano) /etc/nginx/conf.d/long-request.conf:
log_format long_request '[$time_local] $remote_addr $remote_user '
                        '$host $server_port $scheme "$request" $args '
                        '"$http_referer" "$http_user_agent" $status $bytes_sent';
I like to have my configurations as modular as possible with as few duplications as possible. So instead of repeating gzip parameters and proxy ones, I factor them in configuration files under an include directory. It has the advantage that if we need to modify a parameter, it is modified for all instances at the same time.
Create the include directory:
sudo mkdir /etc/nginx/include
Create (sudo nano) /etc/nginx/include/gzip.conf:
# Enable content compression for text types.
gzip on;
gzip_types text/plain text/css text/xml
           application/x-javascript application/xml
           application/atom+xml text/javascript;
gzip_comp_level 1;
gzip_disable msie6;
gzip_http_version 1.1;
Create (sudo nano) /etc/nginx/include/proxy.conf:
proxy_set_header Host $http_host;
proxy_set_header X-Real-IP $remote_addr;
proxy_set_header Upgrade $http_upgrade;
proxy_set_header Connection "upgrade";
proxy_set_header X-Forwarded-For $proxy_add_x_forwarded_for;
proxy_set_header X-Scheme $scheme;
proxy_http_version 1.1;

client_max_body_size 0;  # 0 to disable it
Note: proxy_http_version 1.1; is important to ensure that OctoPrint works correctly since version 1.3.8 and the update of Tornado to version 4.5.3.
Create (sudo nano) /etc/nginx/sites-available/00_octoprint.conf:
upstream webcam   { server 127.0.0.1:6000 fail_timeout=0; }
upstream stable   { server 127.0.0.1:6001 fail_timeout=0; }

server {
    listen [::]:80 default_server deferred ipv6only=off;

    include include/gzip.conf;

    root /var/www/html;

    location = /favicon.ico { access_log off; log_not_found off; }

    location /webcam/ {
        proxy_pass http://webcam/;
    }

    location /stable/ {
        proxy_pass http://stable/;
        include include/proxy.conf;
        proxy_set_header X-Script-Name /stable;
    }

    error_log  /var/log/nginx/octoprint-error.log info;
    access_log /var/log/nginx/octoprint-access.log long_request;
}
nginx_ensite and nginx_dissite commandsThese commands mimic those available for Apache. To install them:
cd ~
git clone https://github.com/perusio/nginx_ensite.git
cd nginx_ensite
sudo make install
You can now disable the default site and enable our sites with:
sudo nginx_dissite default
sudo nginx_ensite 00_octoprint.conf
sudo systemctl reload nginx
sudo systemctl status nginx
You should see something similar to this:
● nginx.service - A high performance web server and a reverse proxy server
   Loaded: loaded (/lib/systemd/system/nginx.service; enabled; vendor preset: enabled)
   Active: active (running) since Fri 2019-08-16 00:06:22 CEST; 2min 33s ago
     Docs: man:nginx(8)
  Process: 26103 ExecReload=/usr/sbin/nginx -g daemon on; master_process on; -s reload (code=exited, status=0/SUCCESS)
 Main PID: 25895 (nginx)
    Tasks: 5 (limit: 4915)
   Memory: 4.4M
   CGroup: /system.slice/nginx.service
           ├─25895 nginx: master process /usr/sbin/nginx -g daemon on; master_process on;
           ├─26105 nginx: worker process
           ├─26106 nginx: worker process
           ├─26107 nginx: worker process
           └─26108 nginx: worker process

Aug 16 00:06:22 octoprint2 systemd[1]: Starting A high performance web server and a reverse proxy server...
Aug 16 00:06:22 octoprint2 systemd[1]: Started A high performance web server and a reverse proxy server.
Aug 16 00:08:43 octoprint2 systemd[1]: Reloading A high performance web server and a reverse proxy server.
Aug 16 00:08:43 octoprint2 systemd[1]: Reloaded A high performance web server and a reverse proxy server.
Since our system is ready, we can now filter ports that do not have to be accessible outside the Raspbery Pi device itself. The Operating System contains a host firewall (netfilter/iptables) and The Uncomplicated Firewall (ufw) is a frontend for iptables:
sudo apt install -y ufw

sudo ufw default deny incoming
sudo ufw default allow outgoing
sudo ufw allow ssh
sudo ufw allow 2022
sudo ufw allow http
sudo ufw enable
Note: Port 2022 is for Eternal Terminal.
Open the URL http://192.168.1.20/stable in a web browser. Then click on Login and enter the credentials you define previously.
Under Connection:
dev/ttyUSB0115200Click Connect. After some seconds, the State changes to Operational.
Click on the Control tab. You should see the video of the webcam.

octo and click on Install under OctoPrint Connection.192.168.1.2080/stableCuraYou can now send sliced GCODE directly to OctoPrint, pause or abort a print, see the webcam, etc.

Prepare the environment, download and install OctoPrint (still with the octoprint user identity):
sudo -iu octoprint
mkdir ~/testing
cd ~/testing

pyenv virtualenv 3.10.7 stable
pyenv local stable
pip install --upgrade pip wheel
pip install OctoPrint

mkdir ~/.octoprint/testing
exit
We use the stable instance as a template to create a Supervisor configuration:
sudo bash -c "sed 's/stable/testing/g;s/6001/6002/g' /etc/supervisor/conf.d/stable.conf > /etc/supervisor/conf.d/testing.conf"
Edit (sudo nano) /etc/supervisor/conf.d/octoprint.conf to add testing:
[group:octoprint]
programs=stable,testing,webcam
Update Supervisor:
sudo supervisorctl reread
sudo supervisorctl update
sudo supervisorctl status
Modify the web site (sudo nano /etc/nginx/sites-available/00_octoprint.conf):
...
upstream testing { server 127.0.0.1:6002 fail_timeout=0; }
...
    location /testing/ {
        proxy_pass http://testing/;
        include include/proxy.conf;
        proxy_set_header X-Script-Name /testing;
    }
...
Activate the changes:
sudo systemctl reload nginx
If, when activating the web site, you get an error such as:
nginx: [emerg] could not build server_names_hash, you should increase server_names_hash_bucket_size
edit /etc/nginx/nginx.conf and uncomment the line:
server_names_hash_bucket_size 64;
Open the URL http://192.168.1.20/testing in a navigator. The Configuration Wizard for this instance appears:
Access Control is now mandatory. Create a user such as admin with a strong password.
Connectivity Check. I use default settings except for the Host IP where I use 1.1.1.1 instead (see 1.1.1.1 on Wikipedia). Click on Test host & port, Test name resolution, Enable Connectivity Check.
Enable Anonymous Usage Tracking as it provides valuable information to Gina and her Privacy Policy and Anonymous Usage Tracking article are pretty clear about the kind of information collected.
Enable Plugin Blacklist Processing.
Fill in Printer Profile. Do not forget Print bed & build volume, Axes, Hotend & extruder. For my printer (Wanhao i3 Plus), I have to invert the Y axis.
Commands:
sudo /usr/bin/supervisorctl restart octoprint:stablesudo /sbin/rebootsudo /sbin/poweroffWebcam & Timelapse Recordings (do not test these settings as Nginx is not yet installed to serve those URLs):
http://192.168.1.20/webcam/?action=streamhttp://192.168.1.20/webcam/?action=snapshot/usr/bin/ffmpegWhen everything is set the way you like, press Ctrl-C to quit OctoPrint process. You can leave the octoprint identity:
exit
Go to Settings (the wrench icon in the toolbar) → Software Update. Click on the Plugin Configuration (the wrench icon) and select:
If any Release Candidate is available, OctoPrint displays a message to perform the update.
To easily differentiate OctoPrint instances, I change the Appearance parameters:
Go to Settings (the wrench icon in the toolbar) → Appearance:
Title: I put something like OctoPrint1-Stable or simply Stable
Green for stable and stable 3, Orange for testing, Red for Unstable, Violet for dev)Notes:: I now prefer to use the Themeify plugin to accomplish a similar effect.
I like to install these plugins:
You have to install these plugins for each instance of OctoPrint.
Very often, people are asking how to expose OctoPrint to the Internet and secure the access. As it is installed, there is no authentication for some parts such as the webcam. Of course, since we are using a reverse proxy, it is possible to restrict accesses at this level (with apache2-utils and, for example, the auth_basic directive). But, as I understand it, OctoPrint was never designed to be exposed to the Internet and thus, doing so represents a security risk.
I prefer to use a VPN. Most of the routers today do offer such functionality coupled with dynamic DNS. I am using Viscosity as VPN client or the native macOS VPN client, but there are several solutions for all platforms.
We now have several instances of OctoPrint running and accessible using their respective paths such as /stable or /testing. But what happen if we enter the default path / (or just the address of the server)? It displays the default (ugly) page of Nginx. It would be better if we can display a page with a link for each instance of OctoPrint.
Do do that, connect again to the Raspberry Pi by SSH (ssh pi@192.168.1.20):
cd /var/www/html
sudo rm index.nginx-debian.html
You can now add HTML files. For example, you can use the files and images I published on GitHub:
sudo wget https://github.com/andrivet/OctoPrint-Instances/releases/download/v2/OctoPrint-Instances.zip
sudo unzip OctoPrint-Instances.zip
sudo rm OctoPrint-Instances.zip
The following page is now displayed for the URL http://192.168.1.20/ :
The version of pyserial currently used by OctoPrint is already patched so there is no need to follow the old procedure.
However, some printers are not supporting 250000 baud rate. This is the case of mine (Wanhao Duplicator i3 Plus), probably due to the cheap USB to UART CH340 chip. The rate I am using with this printer is 115200.
BCM2837 and BCM2711 Broadcom chips and contain a quad-core ARM Cortex A53 or ARM Cortex A72 (ARMv8) cluster (i.e. a 64-bit processor). Frankly, I am not sure of any benefits using a 64-bit OS (probably not) but I want to try.